Feeds:
Posts
Comments

Archive for the ‘Crafts’ Category

A month ago, Little Miss sent out her flat traveler to another homeschooling family in DeMotte, Indiana.

On Saturday, the traveler returned with wonderful tales about her visit with the Purdy family. Little Miss was so excited when she checked the mailbox. She came running back to me, “I got a package Momma! I haven’t got a package in the mail in ever so long.” (Can you tell from her wording that she loves reading the Anne of Green Gables story? LOL)

Her traveler was one of the many free printable paper dolls found on the MakingFriends.com website. This site is one that girl scouts use for making crafts. They also have a large selection of paper dolls that you can print out, along with a large selection of clothes to choose from. You can make boy or girl dolls. The clothing comes separately so that you can cut out what you want to dress the dolls anyway you wish. There are even uniforms and clothing for various careers, costumes for holidays, and even religious dolls, such as outfits to make a paper doll Nativity set.

12342409_10201270111072766_5910969985141212440_n

Little Miss was so excited at the return of her traveler that she was dancing around and hugging the traveler. Out of many sent out over the past couple of years, this is the second one she has had return.

The Purdy family had a lot of fun with the little traveler. They went on outings, such as the Nutcracker Ballet, a candy factory, and a small dairy goat farm. During the visit, the Purdy family had their first heavy snow of the season and took the traveler sledding.

Little Miss was touched so much by how careful the Purdy’s 4 year old daughter took such great care to dress the traveler warmly in doll clothes and tuck her into a doll bed to sleep at night. After Thanksgiving, the family put up their Christmas tree and the traveler was given the honor of being an ornament on the tree for a time.

In the package the traveler returned in, there was a lengthy letter telling about all of the adventures that the traveler got to participate in. They also included some information about Indiana, including maps showing where the traveler had visited. On a very sweet note, the Purdy’s also included a cardinal Christmas ornament, some candy and a brochure from the candy factory, and a jar of Orville Redenbacher popcorn. We learned that Orville Redenbacher was from a county in Indiana not far from the Purdy’s home. Lastly, there was a very special gift bag in the box. It contained a Mickey Mouse door magnet and a pair of pirate earrings that were gifts from the cruise.

Little Miss is thrilled. She loved looking through and reading everything that was sent. In the letter, there were a lot of pictures taken with the traveler. What a fun adventure the traveler had. We are so grateful to them for hosting her.
Read Full Post »

Hard for me to believe that I haven’t posted on the blog for nearly a month.  We have been finishing up our homeschooling for the term and in the midst of it all, we have been dealing with a lot of illness.  First, Pookie was sick, then we all took turns with variations of illness.  Hubby had bronchitis, Little Miss and I had bad colds with a lot of congestion, then Pookie ended up going to the ER due to sinus infection and upper respiratory infection.  It was the only time this winter season when we were all hit with illness like that.  Thankfully, we have all recovered except the residual cough that is hanging on.

We ended up getting out tax returns filed and am thrilled that we don’t owe anything.  The refund we receive will be a welcome blessing.  In the middle of all this, we also found out that Pookie is once again eligible for full disability and that will be starting up soon.  I am SO happy about that.  We will now be able to get him some therapy equipment to use here at home in between his weekly sessions.  There are many things that they use in the sessions that we cannot get through the medical insurance.  This is where his disability check will be a blessing for him.  I can set up an area for a small gym to help build up his strength and aid him in developing his core muscles.  He also struggles with gravitational issues that the equipment that promotes balance will help to overcome.  One item is a rocking board that requires him to balance while doing simple activities on the board.  A small indoor trampoline will help build up muscles in his legs.  Not to mention, there are many occupational therapy related activities that I will be able to buy the supplies for.

I have been working on purging the house of excess a little each week.  The end goal being that we only have the most essential of items remaining.  Living in a small house, storage is a premium.  Especially when the house was built without any built-in storage of any kind.  The goal is to have the purge done before we begin our new school term in May.

I have been writing a little about the purge in my Simplicity by Choice blog.  It is taking longer than I would like, but going at a speed Pookie can handle.  Make too many changes, too soon, and he has trouble coping with it.

One change that he is doing very well with is communication.  Over the past couple of days, he has been using sign language spontaneously and without any prompting.  This happens mostly at meal times, but I am thrilled with what we are able to get.

Little Miss and I are working on new projects together.  She is wanting to learn to do an art journal, so that is now becoming a daily part of life.  We are practicing various art techniques as backgrounds for her to doodle and journal on.  She absolutely loves it!  I am just pleased that she finally found a way to enjoy writing.  LOL


Read Full Post »

Teaching Generosity

The crazy season is upon us. That is what I call it anyways. That season of time when people are becoming almost neurotic over holiday preparations, gift shopping, and attending every holiday event possible. The stress can be high for even the most calm souls. In that time of controlled chaos, what message are we sending to our children? Knowing that they learn from example, are they seeing only the hectic and harried side of the holiday? Or are they being shown the side that promotes charity and compassion?

In our home, we make as many of the gifts by hand as possible. We want the children to learn the value of giving of their time and talents. We have done it this way for the past couple of years since we began keeping the Christmas holiday. In the middle of this, a wonderful thing has happened. Little Miss is learning generosity.
It is too soon to know how much Pookie is learning. But, being that he has no real emotional attachment to most things, he does give to others easily. It is only a matter of knowing how aware he is of what he is doing when he gives things he makes to those around him.

One of the benefits of teaching the children to make their gifts is that they have to use their own time and talents. This has several benefits. Using Little Miss as an example, let me share some of the benefits. First, she has to hone her skills to do her best work on a gift. She always wants her gift to be the best that she can make. So, she spends a lot of time practicing how to do new crafts and use new to her art techniques. Once she chooses a gift to make, she plans it out and works on it to the best of her ability. She takes great care in it. One day, this same trait will serve her well in her chosen career path. Secondly, by putting so much work into her gift, she has developed an appreciation for the gifts that she receives from others. Especially anything handmade. She knows from experience just how much time and work goes into making gifts. That experience has taught her to value the fact that others’ have done the same for what they give her. This carries over to store bought as well. She understands that the person has taken time to plan out what they bought and has matched the gift to what they think she will enjoy the most. This is very true of gifts made or given by someone that she knows has little themselves. Some families that we know are really struggling to make ends meet each month. Little Miss highly values time spent with them and is deeply appreciative of anything they do for her. Another benefit is that the kids are learning to value the time and talents of others more than the price tag of the gift they receive. If it takes Little Miss a few days to make a set of potholders for a gift to a neighbor, then she can appreciate the gift’s value that doesn’t come from a store tag. She knows how much hard work and time went into making a gift. She knows first hand that to spend time and talent making something has a value that you cannot put a price tag on.

Our way of celebrating may not be what everyone would choose. We chose this way as our way of honoring the meaning behind the season. Christ gave of Himself to all mankind. By making our gifts, we are giving of ourselves to others. We are sharing in our time and talents. If we have opportunity to serve with a charity, then that too becomes a way to be the hands and feet of the Lord in the holiday season. My husband was against the celebrating of Christmas when we first got together. He disagreed with the commercialism of the holiday which took away focus to why we celebrate Christmas. Once he learned of what the church taught on this topic, we came to a compromise. We celebrate the birth of our Lord at Christmas. We make sure the children know that this is the reason behind the celebration. We also don’t go into debt with credit cards or small loans to buy gifts. Instead, we give of ourselves through the making of as many of the gifts as possible.

The results have been a blessing to our family. We see a maturity in Little Miss where generosity is concerned. She has things which she values, but is always willing to give it to someone else if they need it more than she does. That has become a blessing of the season that was a precious gift to see as a parent. I love how the Lord has shown us how to use the celebration of Christ’s birth as an opportunity to teach our children selflessness towards others.

Read Full Post »


It has been a little while since my last post. It seems that life gets in the way and time slips by faster than I realize sometimes.

The kids have embarked on a new project that will last for the entire school year. They are sending out flat travelers as a geography project. I went to the Making Friends website and printed out their free paper dolls and an assortment of outfits for the kids to use. After cutting out the dolls and clothes, they were assembled with a glue stick to hold things together. The kids’ names were written on the back of their dolls along with a return address label. Last step, we used the 4×6 inch size self-sealing laminating pouches to laminate the dolls. I trimmed the excess laminate from around the dolls, leaving at least a 1/4” border.

The kids are sending the dolls out with a letter. When the dolls are returned, they will have pictures and a letter talking about the adventures their dolls went on.

For each of the kids, I designed a flat traveler log sheet. On this form we are recording the date the doll is mailed, address it was sent to, what was included with the doll, date it was returned, and notes. For Little Miss, I also printed out the free printable State Notebook Pages from Harrington Harmonies website.

Little Miss will be making a scrapbook style notebook for her traveler. While the doll is on her adventure, Little Miss will be filling out the State Notebook Pages for the state her traveler is going to. When the traveler returns, she will add the letter, pictures, and anything else she receives into the notebook as well.

Pookie’s notebook will be a scrapbook of his traveler’s adventures. At this point, he is still too young developmentally to do the notebooking pages. He loves to look through pictures however, so a scrapbook of the traveler’s trips will be fun for him.

It will be exciting to see all the places that the kids’ travelers go to visit. We have a list of friends wanting to host a traveler as well as other places to send them to. Pookie’s traveler is making a trip down under to the Australia Zoo this week. Little Miss has one traveler going to a friend in Texas and another will be going to the historic Jamestown settlement. She is currently studying about Jamestown, so the traveler’s visit will work well into her lessons.

Think of places that your kids are studying about. Why not mail a flat traveler to those locations? While you may not be able to go there personally, your child can experience them through their flat traveler. Check online to see if the various attractions or historical places have an education department. If so, that department may be more than happy to host your child’s traveler. Why not send the traveler to a Renaissance festival? Or on a trip to see the Smithsonian museum? What about the NASA Space Center in Florida? There are so many ways that you can expand your child’s horizons through flat travelers. Where will your child’s traveler go?

Read Full Post »

DIY Art Supplies

It is that time of year again when families are getting sticker shock at the prices of Back to School supplies for their kids.  Just like those in public or private schools, children who are homeschooled go through a LOT of supplies each school term.  One thing that I notice in homeschooling Little Miss and Pookie is that we go through more supplies than when my older kids were in public school.  Items like paper and pencils are about the same as when the older children went to school, but art supplies is a whole different matter.

It is amazing how much paint and other basic art supplies we go through.  I like to encourage the kids to be creative in their play as well as art.  In order to do this, I sometimes have to be a bit creative myself when it comes to obtaining supplies.  The best thing I ever did was search for recipes to make homemade supplies.

Now, I know that children who are not homeschooled wouldn’t be able to take the homemade art supplies to school.  They can use them at home for their fun projects.  For families who homeschool, the homemade versions of art supplies can be a huge blessing to the budget.  We also see it as a great way to teach our children to be more frugal.  By making the supplies at home, we are able to get the supplies much cheaper.  In winter months, it is especially helpful to have the recipes so that I am not having to travel to the city to buy supplies we have run out of.  If we run out of a specific color of watercolor paint on a pallet, then I can make more of that one color instead of having to buy a whole new set of paints.

There are two resources that are my “go-to” places to find recipes.  I strongly suggest that you test a few out.  One recipe may work better than another, depending on the type of project you are doing.  I finally began recording the recipes which gave me the best results in a small notebook for quick reference offline.  Some recipes seem to work better than others.  It all comes down to your own preferences.

The first site that I recommend is Make, Create, and Do.  This page has some very good recipes for the basics that a young child or preschooler would use.  I have used several of them with good results.

The second site, Artists Helping Children, has a larger number of recipes to choose from, included some that are better suited for older children.  Overall, they have a wide range of supplies that you can make which would benefit children of any age.

I know that there are many more websites with recipes for art supplies.  Of all that I have looked at and tested recipes from, the two listed above have been the best.  If you know of another website that has recipes that you have tried and had good results with, I would love to know about them.


Read Full Post »

I have been working on a storage binder for Pookie’s collection of PECS communication cards. What a task! It is amazing the sheer number of cards that you can come up with. When I first began looking for graphics for his cards, I struggled to come up with things that would be needed. Now, after watching how they are used in his therapy sessions, I am getting a lot more ideas on what cards to have done up.

My favorite “go to” website for making his cards is still the SEN Teacher website. On SEN Teacher, you can go to the printables area and find the option for making your own PECS cards. They give options for sizes, with or without borders, and the choice of using their search engine for graphics or uploading your own.

Making the Binder:

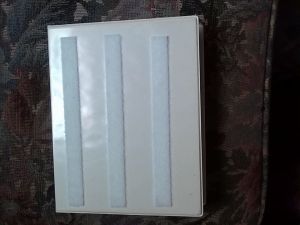
You will need a 3-ring binder (I used a half sized one for this project)
Cardstock, for the pages
Heat laminate
Adhesive-backed hook and loop tape*
Hole punch
Scissors

*Note: for clarification purposes, Loop tape is the soft fuzzy portion. Hook tape is the rough portion.

Step 1: Turn your binder so that the hinge side is facing away from you. I wanted the book to be a flip-book that has pages that flip upwards. Cut 3 strips of loop tape to length so that it fits parallel to the hinge edge. Adhere the strips evenly to form 3 rows. (Later, you will be able to use these rows as a visual schedule or a choice board.

1503899_4140428206973_6672693843282095375_n


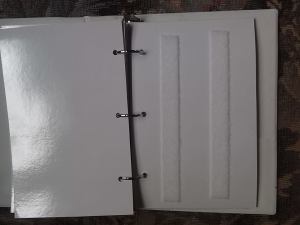
Step 2: Using heat laminate, laminate the cardstock pages. If using a half-size binder, cut the pages in half to fit. Be sure to not use contact paper or a cold laminate for this step. The adhesive on the hook and loop tape does not stay adhered to cold laminate. It only works well on heat laminated items. Hole punch the pages to fit into the binder.

1549226_4140428646984_6367879744554986446_n

Step 3: Adhere 2 rows (up to 4 rows if using a full sized 8.5×11 inch binder page) loop tape onto each page. If desired, you can add the loop tape rows to both sides of each page.

Step 4: Place pages in to your binder and Voila’ you are done.

PECS cards: I went to the SEN Teacher website and made the cards we needed to start with. The therapists offered to print them for me and heat laminate them. So, I saved the cards to my computer and emailed the files to them. At Pookie’s next appointment, they were already printed and laminated for us. All I had to do was trim the cards out and adhere a piece of the hook tape to the back of each card.

To use the binder, I first organized the PECS cards by category. I arranged each category on its own page in the binder. Most frequently used categories are towards the front of the binder.

10007447_4140428846989_6719819519674449372_n

When I am setting up Pookie’s visual schedule, I place the cards onto the front cover of the binder starting with the top row and going from left to right. We start by choosing what activities he will do and in what order. I generally will set a limit of about 5 activities as a time. I place the cards in the order chosen onto the binder cover. If at home, I have a container sitting beside the binder. As he chooses each activity, the card is placed into the container. If we use the binder away from home, a blank page in the front of the binder can serve as a storage place for the cards instead of the container.

After we have completed the session, I place the cards back onto their pages. This makes it easy to find them again next time.

One idea that I haven’t done for this binder, but plan to do next time is to print out an extra copy of the PECS cards. The second set can then be used to make an index for the cards. This way, if a card should be lost, I will know which one needs to be replaced. It will also help later on when Pookie is old enough and used to using the binder enough to put the cards away himself.

In making the binder, I was surprised at how fast I ran out of the loop tape. I guess that I shouldn’t have been surprised, but I was. We had just opened up a new 15′ long roll of the hook and loop tape for this project. By the time I placed the rows on the cover and on about 8 pages, the loop tape was gone. I now have 15′ of hook tape left over but I know that will be gone quick enough once I get more cards printed up. I stopped using the hook and loop “coins” for the PECS cards. In the long run, it is far less expensive to by the long strips and cut them to size. The cheapest resource that I have found for them locally is the Lowes store. The hook and loop tape comes in 15′ rolls.

As I finished this little binder, I am already making plans to do a regular sized binder. That one will be at least 2 inches thick to allow room to grow. I simply filled up the 1″ binder way too quickly. Once I have the larger one made, I will relegate the half size binder to be Pookie’s working binder. It will only contain the cards he uses most often. Some of the pages in his working binder could be outing-specific. For example, cards for going to the Zoo so that he can let me know what animals he wants to see the most. Maybe pictures of his favorite foods sold at the zoo, funnel cake, nachos, and seasoned fries are his favorites. It would give him the ability to choose what he wants to eat. We could do the same for other restaurants or fast food locations. The key idea is to give him the communications skills he needs to make independent decisions for himself.

Read Full Post »

Story Stones

I have been finding the cutest idea on Pinterest lately. They are called Story Stones. These smooth stones are small enough for preschoolers to handle, yet too big to be a choking hazard. Buying a set of story stones can be pricey. Today, I found a preschool blog called Pre-School Play that tells how she made them herself. She also shows a good number of examples of the ones that she made. I am thinking of so many ideas for using this idea.  Alphabet letters, numbers, stones painted like dominos, and of course the story elements.

Here are some more story stone idea links that I found that are very inspiring.

Easter Story Stones includes the story

Fairy Dust Teaching has a photo tutorial on making the story stones

Adventures at Home with Mom has a great post about the benefits of story stones along with examples of the ones she has made.

Crafty Mom Share has a blog post about the Nativity story that includes a picture of the Nativity story stones she made.

Thrive 360 Living has a great example of story stones they made for the book, The Very Hungry Caterpillar.

My Small Potatoes has a great picture tutorial on hand painting story stones.


I am so excited to give this craft idea a try.  I am always looking for new ways to incorporate pictures or other hands-on elements into story time with Pookie.  I can see so many uses for this, including using them for story sequencing activities.  These websites were very inspiring.  Making a set of story stones for the Nativity would be a great gift idea for the little ones in the Children’s Church class.  Maybe make some for other Bible stories using elements of each story to paint or decoupage onto a stone.  The ideas are only as limited as our imaginations!

Enjoy!


Read Full Post »

Sensory Afghan

Our son, Pookie, is obsessed with textures.  He loves the sensory input he received from them.  One of his favorite places to go is the carpet isle of Lowes.  He rubs his hands across the variety of swatches.

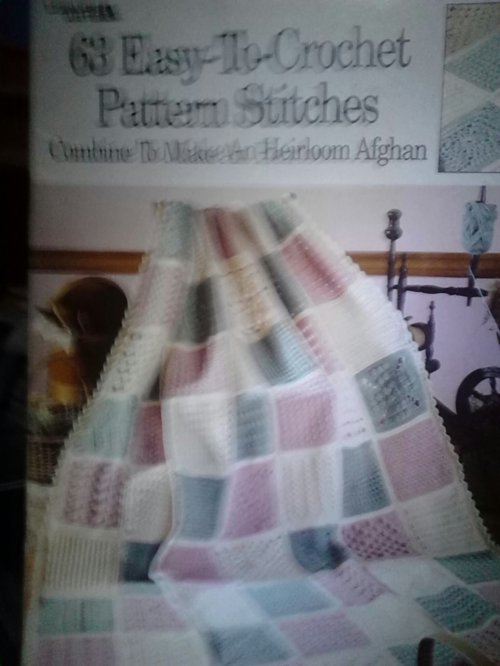
With that in mind, I dug out an old crochet booklet that I have had for several years.  I apologize for the lighting, took the picture by oil lamp light.  The book is called, ” 63 Easy-to-Crochet Pattern Stitches, Combine to Make an Heirloom Afghan”  by Leisure Arts.

image

I am going to use the idea of a stitch sampler to crochet Pookie a textured afghan.  By using a variety of stitches and yarns, I will be able to make him a blanket that will not only keep him warm but provide sensory input that he craves.  I may make a smaller one as well for when he is in the car seat or we are away on an outing.

Read Full Post »

Homemade Play Dough

It is that time again. Thinking about little gifts to make for kids. Nearly every child I know likes play dough. I have had requests to post the recipe that we use. Here is the recipe. All ingredients are easily found in the kitchen pantry. The finished product smells just like the store bought. Note: you can scent and color this by adding a packet of kool aid but I wouldn’t recommend it if your child likes to eat play dough.

Homemade Play Dough

1 cup flour
1/4 cup salt
2 Tbsp Cream of Tartar
1 cup water
1 Tbsp oil
Food coloring

In a saucepan, mix all ingredients. Heat over a medium heat stirring constantly. When mixture thickens and begins to clean the sides of the pan, remove from heat. This process takes about five minutes.

Turn mixture out onto a lightly floured table and knead as you would bread until no longer sticky. Let cool completely. Store in an airtight container.

Typically, this play dough will last over a year if stored correctly.

Enjoy!

Read Full Post »

Little Miss is in paper doll heaven. While looking for printable dolls to use for flat travelers, we had found the Making Friends website. Ever since, she has had fun putting together dolls to play with. With the amount of clothing, hair, and theme variations I doubt she will be bored anytime soon.

We took a few of her dolls with us to the Mardel’s Christian book store in OKC.  There, we were able to laminate the finished dolls. She loved it!  A surprise that I have planned for her is to print out the nativity dolls set. I know she will have a lot of fun putting that together and playing with it.

It is so fun to watch my daughter find joy in the same things I enjoyed as a kid. I clearly remember the paper dolls I had. I kept them in a shoe box and could spend hours playing with them. Many were taped to repair them from all the use they got.

What started the paper doll interest for Little Miss was reading about the Ingalls’ girls playing with ones their Ma helped them make from paper during the winter.

We are so blessed to have a daughter who finds the simple things to be so entertaining. She would be happy if we gave her an envelope full of printed out dolls with all the clothes and such for Christmas. 

Next doll to find for her is biblical characters. She has been asking for some. So, now the hunt for ones we can use to go along with Bible stories.

Read Full Post »

Older Posts »